Raw Milk Kefir
As you learn new skills in the kitchen, you may be figuring out how to make kefir from raw milk. Fermented dairy has many health benefits and is so easy to implement into your daily life. It is low maintenance and doesn't require any crazy measuring or lengthy process. This is something that anyone can do!
Servings: 1 jar
Calories: 136kcal
Ingredients
- Milk kefir grains
- Raw cow's milk
Instructions
Day 1
- Put your milk kefir grains in a glass jar.
- Cover the grains with milk. Leave about a half-inch of space at the top of the jar.
- Loosely place the lid on top of your jar. Ferment on the counter for 24 hours.
- **You can choose to let your raw milk kefir ferment for one extra day if you choose! If you decide to go an extra day I recommend putting it in the fridge for that second day for a slower ferment. If you wait an extra day, do this next step of the process the following day!**
Day 2 (or 3)
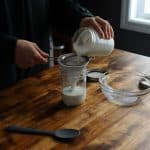
- Set up one of your jars with a funnel and mesh strainer. Carefully pour your kefir into the strainer.
- Use your spoon to gently push out any kefir that's left in the grains.
- Put the grains in the other jar and cover with raw milk to repeat the process.
- Your milk kefir is ready to enjoy! Store in the fridge with a lid on.
Notes
Nutrition
Calories: 136kcal | Carbohydrates: 11g | Protein: 7g | Fat: 7g | Saturated Fat: 4g | Polyunsaturated Fat: 0.2g | Monounsaturated Fat: 2g | Cholesterol: 27mg | Sodium: 86mg | Potassium: 340mg | Sugar: 11g | Vitamin A: 367IU | Calcium: 279mg