
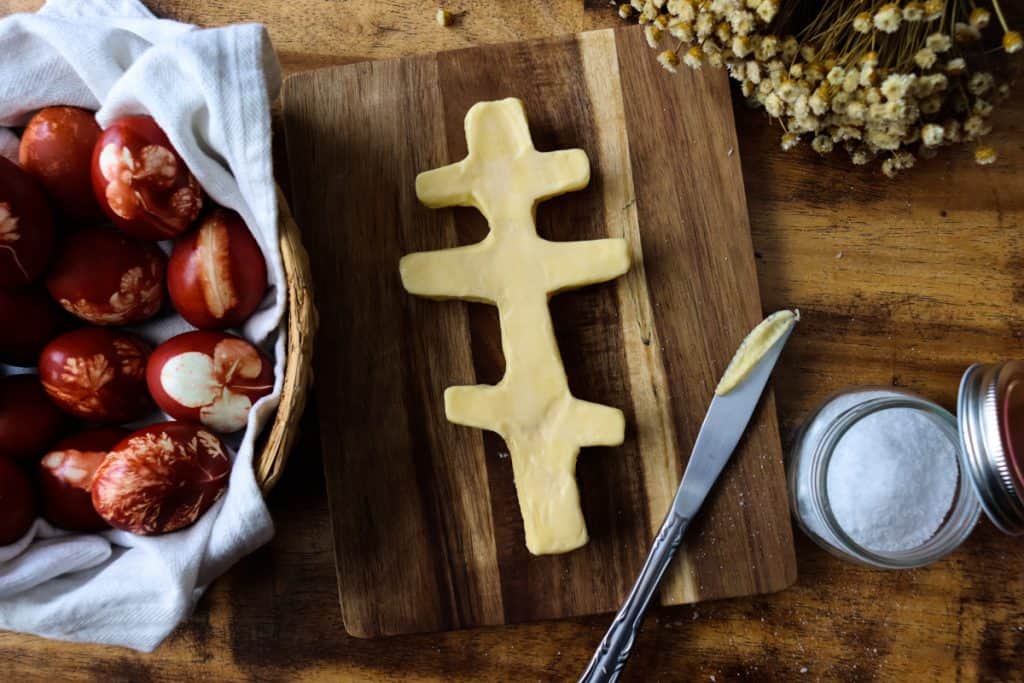
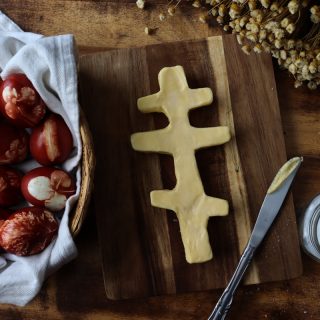
In a traditional Pascha (or Paskah) basket, Orthodox Christians will include butter! It is often shaped like a lamb or like an Orthodox cross. I decided to make my butter in the shape of an Orthodox cross, but that meant I needed to make my own handmade butter mold too. I will walk you through the process step-by-step from crafting your own mold to gently removing your completed Orthodox Pascha butter cross!
There are so many gorgeous traditions that are honored by my family and passed down through the generations. I love continuing these and adding my own touches or even bringing back things that haven't been done in a long time. Creating beauty in even the simplest of things on special occasions makes the day so unique to your family and the memories are sure to be cherished.
This Post May Contain Affiliate Links. Please Read Our Disclosure Policy.
We choose to honor both our cultural heritage as well as the culture we live in for Pascha. Modern "Easter" baskets with books, small gifts, and treats are given to our sweet babies in the morning. I also create a traditional Pascha basket for our whole family with all the elements that have been used forever. This year, I made our butter in the shape of a cross and I absolutely love it.

Why do Orthodox Christians put butter in traditional Pascha baskets?
Butter symbolizes the Lamb of God and the goodness of Christ. Some people have butter lambs to display this meaning while others have theirs in the shape of an Orthodox cross. Either way is completely acceptable and equally lovely! If you are in a season where making or buying fancy butter isn't in the cards, a normal stick of butter is also just fine for your basket. Pascha is also when Great Lent ends and butter can be enjoyed again after quite a long fast!
You can use any kind of butter you would like! Feel free to make your own or use storebought. Either way, it will need to be at room temperature so it's soft and able to be spread in your homemade mold.
What should I put in my Pascha basket?
Traditional Pascha baskets include delicious items that are beautifully symbolic.
- Sweet Bread - Leavened sweet bread symbolizes the New Covenant. Some people make a braided loaf to also represent the trinity.
- Bitter Herbs - The use of bitter herbs in the basket carries two meanings. It ties the Old Testament to the New Testament. Horseradish is commonly used as it is a traditional part of meals for Passover and is now used for Pascha to represent the bitter sacrifice of Christ on the cross. Beets can be used to color the horseradish red to symbolize Christ's blood.
- Pascha Cheese - This cheese is a reminder of the earthly gifts from God as well as the sweetness of the Kingdom of Heaven.
- Butter - Shaped like a cross or a lamb, butter has a similar meaning to the Pascha cheese. It is a symbol reminding us of the sacrifice of the Lamb of God. (Hence why some choose to shape their butter like a lamb!)
- Red Eggs - Eggs carry the promise of new life, just like Christ rising from the tomb. They are traditionally colored bright red either with natural dying methods or a bright pigmented dye. Some people use wax or flowers and leaves to make designs on their eggs. When Mary Magdelene went to proclaim, "Christ is Risen!" to the Emperor with a basket of boiled eggs to bring to the tomb with her, he laughed at her. He made fun of her by saying that Christ had no more risen than the egg in her hand was red. The egg suddenly turned deep red! We color our eggs red to remember this event.
- Meat - Cooked meat and/or jerky-style meat symbolizes the bounty of God.
- Salt - Salt represents us, the salt of the earth. It is a reminder of who we are as Orthodox Christians and our duty to others.
- A Candle - This candle will be lit at the end of Liturgy. It represents Christ, the light of the world. Lighting the candles right before the baskets are blessed is such a beautiful ending to the service and welcoming of Bright Week (also referred to as Pascha Week or Renewal Week.)
- An Icon - An icon of the resurrection or any icon (or icon card) of Christ can be included in your Pascha basket.
- Basket Covering - Many people from all over the world love to embroider "Easter" basket covers. There are variations of this for Pascha as well from different cultures. They are more than just for beauty though! The basket covering symbolizes Christ's burial shroud.
- Optional: Wine - This is optional as many poorer communities back in the day omitted this due to availability and cost. It can also be considered optional if you do not drink for any reason or if you simply don't want to include it. Wine represents spiritual knowledge. Cheers with a glass of wine to our knowledge of the Holy Resurrection.
- Optional: Treats - Have fun with this! It makes a traditional basket have a slightly modern touch and is a great way to get the whole family involved. Let every member of your family choose a treat they enjoy to add to the basket!
Join me over on Instagram!
Follow me on Instagram and tag me when you make your own traditional Orthodox Butter Cross this Pascha! Also, use the hashtag #tulipsandtwill so others can be inspired by your post too!
Everything you need to make your homemade Orthodox Butter Cross (including the mold!)
- Paper.
- Pencil.
- Cardboard.
- Permanent marker.
- Scissors.
- Aluminum foil.
- Packing tape.
- 1 cup of butter (Homemade or storebought. Room temperature so it is soft.)
- Jewelry wire.
- Clippers that can cut wire.
- Butter knife and/or spoon.


How to Make an Orthodox Pascha Butter Cross | Handmade Butter Mold
1.) Draw or pint an Orthodox cross in your desired size on a piece of paper in pencil to create your template. I free-handed mine. Optional: Trace over the final lines with a permanent marker to help you cut in the proper places.

2. Cut out your paper template. Number all the sides. (You will have 1- 28 when you are done!)
3. Use your template to get the proper lengths as you cut small pieces of cardboard the size of the sides. The height is up to you! The height determines how thick your butter cross will be.
4. Label each piece of cardboard with the corresponding number on your template.
5. Tape each piece together in order.


6. Use wire around the outside of the cardboard pieces to help shape your cross.
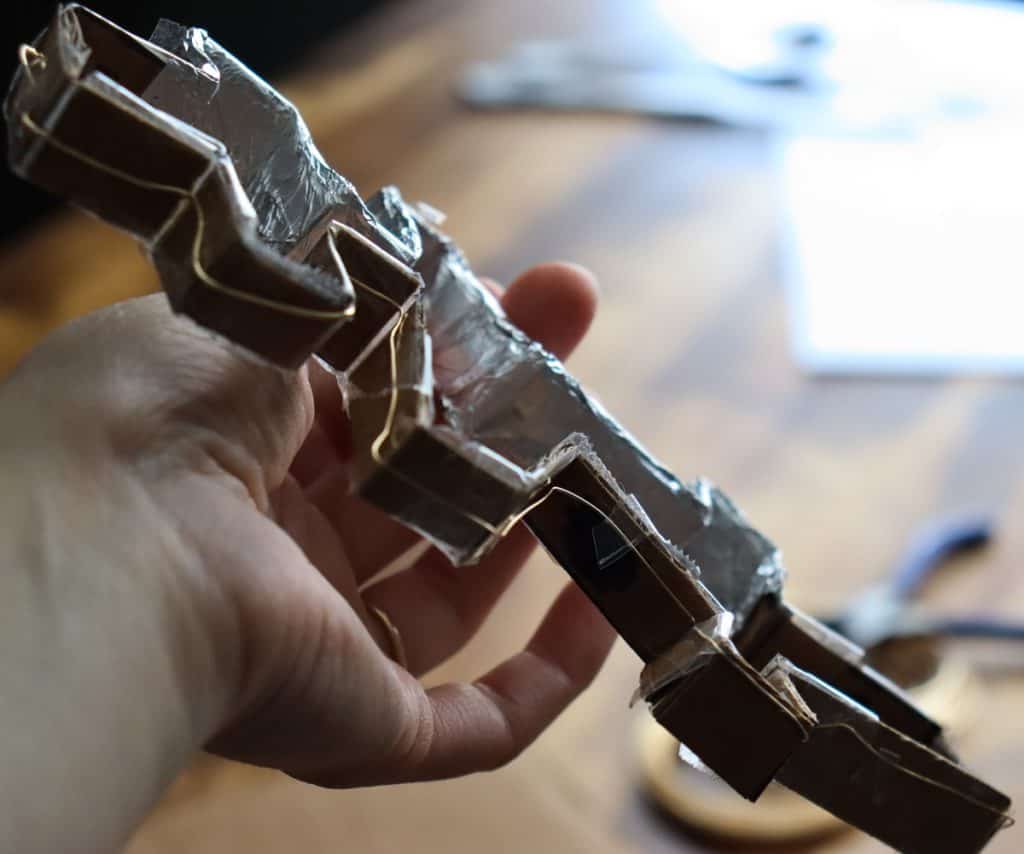
7. Wrap tin foil around the cardboard. Be sure it is wrapped tightly so no butter ends up on your cardboard! Do more than 1 layer. 2-3 at most!


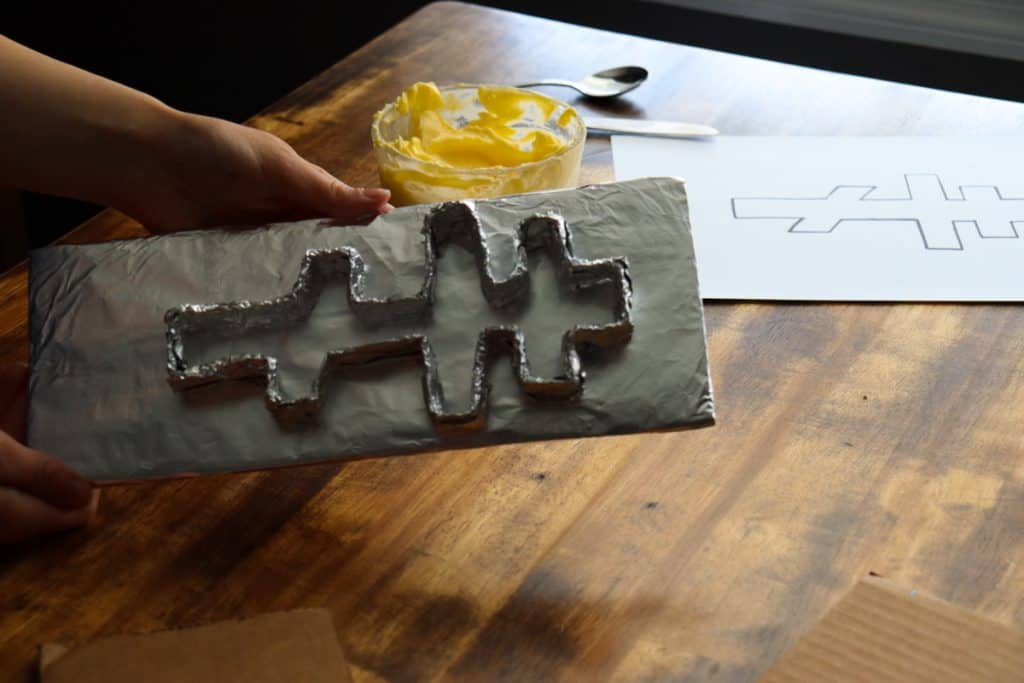
8. Wrap a piece of cardboard in tin foil that your cross can rest on.

9. Tape the sides to the base on the outside of the foil-covered cross.
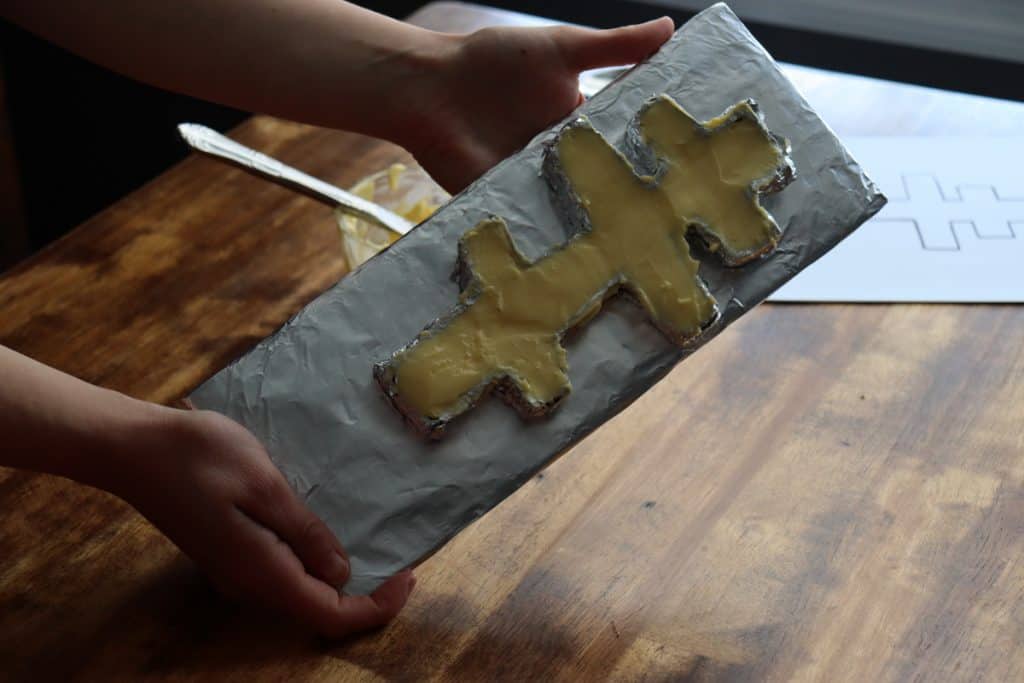
10. Fill your mold with your smooth warm butter! Pack it tight!!

11. Smooth the top with the back of a spoon or a butter knife.

12. Place in the freezer overnight.

13. Using a butter knife, gently remove your butter cross from the mold. Optional: warm the knife by dipping it in warm water. Work slowly and carefully!

14. Using your slightly warmed knife, smooth the top and the sides.

15. Your cross is all ready! If you are adding it to a Pascha basket, wrap it in plastic wrap or store it in a glass food storage container so it can be seen. If you are placing it on a table, display however you like such as on a wooden cutting board. Enjoy!

Helpful Tips!
- Use a stand mixer or handheld beaters on your room temperature butter to make it softer if need be. You want it to be easy to spread into your mold.
- Dipping your butterknife in warm water will help you remove it from the mold. It will also make it easier to smooth out and shape if need be.
- Be sure to check over the butter for any stray pieces of tin foil!!
What are you adding to your basket this Pascha?
Leave a comment below to tell us all about it!
How to Make an Orthodox Pascha Butter Cross & Handmade Butter Mold
Equipment
- Paper
- Cardboard
- Scissors
- Foil
- Packing tape
- Jewelry wire
Ingredients
- 1 cup butter Homemade or storebought. Room temperature so it is soft.
Instructions
- Draw or pint an Orthodox cross in your desired size on a piece of paper in pencil to create your template. I free-handed mine. Optional: Trace over the final lines with a permanent marker to help you cut in the proper places.
- Cut out your paper template. Number all the sides. (You will have 1- 28 when you are done!)
- Use your template to get the proper lengths as you cut small pieces of cardboard the size of the sides. The height is up to you! The height determines how thick your butter cross will be.
- Label each piece of cardboard with the corresponding number on your template.
- Tape each piece together in order.
- Use wire around the outside of the cardboard pieces to help shape your cross.
- Wrap tin foil around the cardboard. Be sure it is wrapped tightly so no butter ends up on your cardboard! Do more than 1 layer. 2-3 at most!
- Wrap a piece of cardboard in tin foil that your cross can rest on.
- Tape the sides to the base on the outside of the foil-covered cross.
- Fill your mold with your smooth warm butter! Pack it tight!!
- Smooth the top with the back of a spoon or a butter knife.
- Place in the freezer overnight.
- Using a butter knife, gently remove your butter cross from the mold. Optional: warm the knife by dipping it in warm water. Work slowly and carefully!
- Using your slightly warmed knife, smooth the top and the sides.
- Your cross is all ready! If you are adding it to a Pascha basket, wrap it in plastic wrap or store it in a glass food storage container so it can be seen. If you are placing it on a table, display however you like such as on a wooden cutting board. Enjoy!


Leave a Reply