
Sensitive to fragrances? These DIY unscented soy candles are a beauty to the eye without being harsh on the nose!
I love the flicker of candlelight, but I prefer to diffuse oils if I'm wanting to fill the room with a lovely aroma. Making unscented soy wax candles ensures there won't be any conflicting smells in your home! This DIY keeps it plain and simple with no added oils or colorants. You can choose to customize your jar or leave it simple and classic. The choice is yours! My best friend is so sensitive to even the most natural of fragrance options, so these are perfect for when she comes over (and as a gift!) I plan to make her some and decorate the outside of the repurposed glass jar by using glue to paint on and seal pressed flowers from my garden.
These are vegan-friendly and paraffin-free candles, without the high price tag. This inexpensive DIY takes no time at all to create and then you let it sit overnight. Boom! It's that easy. Whether you want to add a handmade touch to your own space or need a short notice gift for a loved one, this DIY has got you covered!

This Post May Contain Affiliate Links. Please Read Our Disclosure Policy.
What is soy wax?
Soy wax is a wax made from soybeans! It is a renewable resource for candlemaking unlike many options on store shelves that are paraffin based.

No! Soy wax is all natural adn therefore your candles will not be toxic. Be sure to also use a natural wick to ensure your candles are 100% clean.
Why is my candle frosting?
You may be wondering, what is frosting on a candle? Frosting is when you look at your candle from the top or side and see a snowy appearance on the glass from the inside or on the top layer. This is caused by pouring your candle at an improper temperature. It is purely cosmetic and does not impact the function of your candles!
It's not something I personally care about when I make these for personal use! If you want to prevent this then you may need to use a temperature gun and take some notes as you create a few test candles to find your ideal pour temperature. This can be anywhere between 110° F and 130° F. Another easy tip for preventing frosting on your soy wax candles is to let them cool on a wire rack so the bottom isn't retaining all the heat as it cools down. When you are done pouring your candles, let them solidify in a room that's at a pretty normal temperature. Don't put them in the fridge or a cold room as this can contribute to frosting as well as other issues.

Follow along on Pinterest!
Save this on Pinterest for later and follow me for more ideas!
Soy candle making materials
- Soy wax - Try your best to find USA-based soy wax from the midwest to reduce your carbon footprint. I choose to use the soy wax pellets as they're very easy to measure and work with. They melt down very quickly since they are so small!
- Cotton wick - 100% cotton wicks are one of the best options for candle wicks and it is generally pretty cost-effective to buy a big spool of it.
- Pencils - These pencils will be used to help hold the wick in the center of your jar and keep it from falling in.
- Microwave safe measuring cup OR double boiler - You can use your microwave or stovetop to melt down your wax. Just remember to be careful when working with hot wax!
- Spoon or butterknife - Stir as your wax melts down to speed up the process.
- Repurposed glass jar - Upcycle a wide-mouth glass jar from your kitchen for the most eco-friendly option! You can also use:
- Teacup.
- Small wide bowl.
- Empty tea light tins.
- Ramekins.
- Flowerpot with no hole in the bottom.
- Shot glasses.
- Silicone molds of all different shapes and sizes.
Unscented soy tealights can be made in tiny metal tins! They are gorgeous and you can easily make a whole bunch of them! You can also make unscented soy pillar candles using a silicone mold.

An unscented soy wax candle, an herbal oatmeal bath bomb, a jar of rose bath salts, a jar of sugar scrub, and a dropper bottle of cuticle oil!
Tools and Materials
- 2 cups soy wax.
- Cotton wick.
- Scissors.
- Pencils.
- Jars/containers.
- Microwave safe measuring cup OR double boiler.
- Butterknife or spoon.
- Potholder OR oven mitt.


How to Make DIY Unscented Soy Wax Candles
- Measure out 2 cups of soy wax in a microwave-safe container. I like to work with 1 cup at a time for small projects like this. Melt at 30-second intervals OR use a double boiler to melt it down.

2. Cut your wicks to size.

3. Set up your wick on your pencil by wrapping it around a few times and/or tying a loose knot.

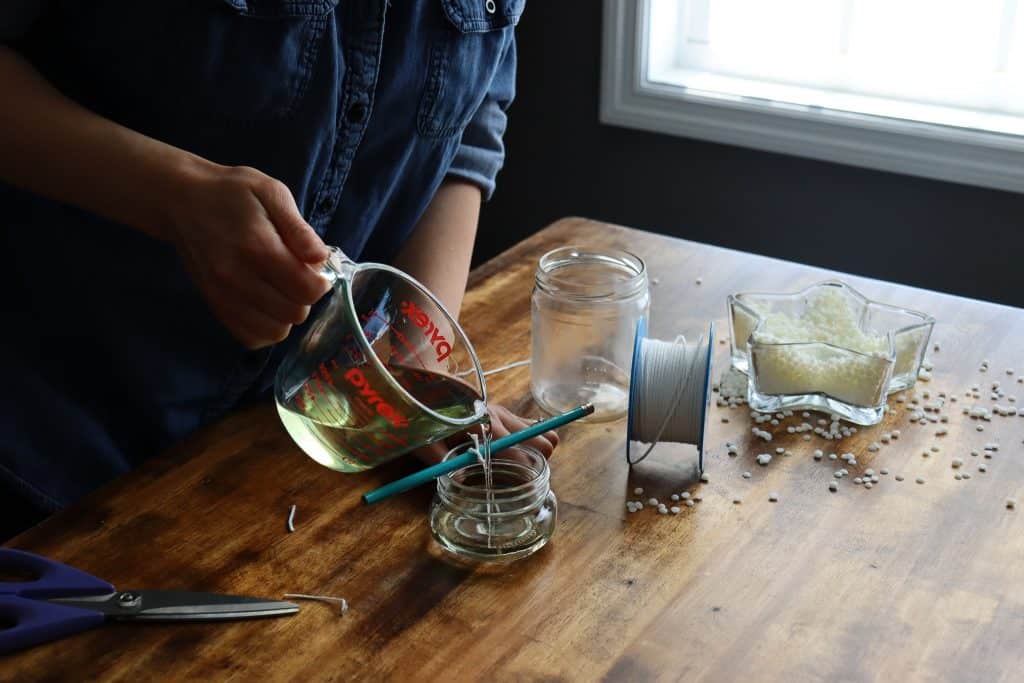
4. Put a small amount of soy wax on the bottom of the wick by dipping it in the melted wax and position it in the center of the bottom of your jar.

5. Slowly and carefully pour in your wax. Pour it until it is at the curve of your jar or be sure to leave a bit of space in the top of whatever container you are using.
6. Allow your candles to cool and set overnight.

7. Trim your wick so that it isn't so short that it's barely visible but not so long that it curls. Feel free to get creative with decorating the outside of your jars at this time. Enjoy your lovely homemade soy wax candles!


Notes for making soy wax candles
- Two tips for preventing frosting: (1.) Test different pour temperatures. (2.) Let them cool on a wire rack so the bottom isn't retaining all the heat as it cools down.
- Allow your candles to cool naturally, don't put them in the fridge or in a cold room!
- If the top of your candle ends up with a crack in it you can use a heat gun to gently melt the top layer and let it set again.
- Be careful when working with hot wax! I use a potholder when pouring my candles as the container is very hot from the microwave. Be careful not to get it on your skin as it will burn you.
Shop this post
You may also like
Will you be making some unscented soy candles?
Leave a comment below and tell us what container or mold you're going to use!

DIY Unscented Soy Candles
Equipment
- Scissors
- Pencils.
- Jars/containers
- Microwave safe measuring cup OR double boiler
- Butterknife or spoon.
- Potholder OR oven mitt.
Ingredients
- 2 cups soy wax
- Cotton wick
Instructions
- Measure out 2 cups of soy wax in a microwave-safe container. I like to work with 1 cup at a time for small projects like this. Melt at 30-second intervals OR use a double boiler to melt it down.
- Cut your wicks to size.
- Set up your wick on your pencil by wrapping it around a few times and/or tying a loose knot.
- Put a small amount of soy wax on the bottom of the wick by dipping it in the melted wax and position it in the center of the bottom of your jar.
- Slowly and carefully pour in your wax. Pour it until it is at the curve of your jar or be sure to leave a bit of space in the top of whatever container you are using.
- Allow your candles to cool and set overnight.
- Trim your wick so that it isn't so short that it's barely visible but not so long that it curls. Feel free to get creative with decorating the outside of your jars at this time. Enjoy your lovely homemade soy wax candles!
Notes
- Two tips for preventing frosting: (1.) Test different pour temperatures. (2.) Let them cool on a wire rack so the bottom isn't retaining all the heat as it cools down.
- Allow your candles to cool naturally, don't put them in the fridge or in a cold room!
- If the top of your candle ends up with a crack in it you can use a heat gun to gently melt the top layer and let it set again.
- Be careful when working with hot wax! I use a potholder when pouring my candles as the container is very hot from the microwave. Be careful not to get it on your skin as it will burn you.


Julie
I always like to have a few candles around for those winter days when we might loose power. I love that these are fragrance free since I've very sensitive to added scents.
tulipsandtwill
Lindsey,
Finding ways to finally use the last bits of supplies from previous projects is the best! (Don't we all have a box of "in case I need this in the future..." somewhere?!)
-Mariana
tulipsandtwill
Emily,
I can't wait to see what you create!
-Mariana
tulipsandtwill
Felicia,
What a lovely memory! Doing this now will give your children the same fond memory and help to pass this simple skill down to the next generation.
-Mariana
tulipsandtwill
Krista,
I'm so happy to hear you finally feel confident enough to give it a try!
-Mariana
Krista
You make it sound so simple! I've been planning to make candles for months. I even got the materials but I've chickened out. Thanks for the tutorial to help me be more confident. I'm one of those who are super sensitive to smells and I love the idea of making my own!
Felicia
My mom used to make candles all the time when I was a kid. I haven’t thought about that in such a long time. Thanks for reminding me of a sweet memory. I think I need to try and do this soon.
Emily
I'm excited to try these!
Lindsey Winters
I love this! I have some soy wax left from making natural fire starters. These candles will be perfect for me to use the rest of my soy wax for! Thanks!